K12Linux Quick Start Guide
Please visit
k12linux.org
for the latest version of these instructions.
Welcome to K12Linux, which is Linux Terminal Server Project (LTSP) software, version 5,
running on Fedora Linux.
This Live image is most useful for two purposes:
- Convenient demonstration of K12Linux without installing anything on your
hard drive. You can boot your server from a USB stick, and after some simple network
configuration you can serve a few thin clients.
- Installing K12Linux onto a hard drive.
Use the "Install to Hard Drive" launcher on the Desktop to do this.
Then follow this guide to enable the LTSP services and you can serve up as many thin clients
as your server hardware will support.
K12Linux is preconfigured with LTSP services enabled and the
client chroot installed in /opt/ltsp/i386. By default the LTSP services, including
a preconfigured DHCP server, NFS server and PXE tftp, are served on a virtual
bridge named ltspbr0, which you'll be connecting to one of the server's network
ports.
While LiveDVD is possible, LiveUSB with persistent overlay is recommended because
it is more efficient in RAM usage. Be warned that your overlay or ramdisk will
fill up and the demo will fail after a while, so do not rely on this Live image
for production services. For production use, please install K12Linux onto a real hard
drive.
Setup Instructions
This Quick Start Guide explains how to quickly configure the server's networking to support
thin clients. It assumes that the server has two wired network ports, or one wired port &
one wireless. One interface, either wired or wireless, is for accessing the Internet
on your normal network. The other interface, wired, is dedicated to serving an isolated
network segment for thin clients. Other methods of configuration such as
"Single Network Card" are more advanced and require manual configuration
beyond the scope of this guide. Please see K12Linux.org
or ask on our mailing list for more information about other ways to configure networking.
WARNING: The bridge interface, ltspbr0, has a DHCP server running on it. Be especially careful
that you do not attach your Internet-facing network interface to ltspbr0 or you
can cause serious problems for your network.
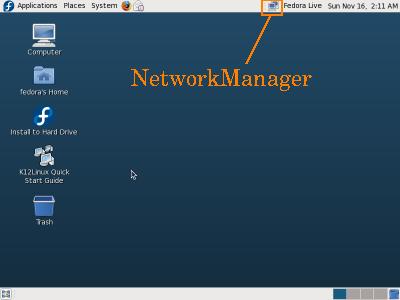
- Upon booting the K12Linux server, NetworkManager has control over
all network interfaces. This can be good if one Ethernet port has Internet
access or if you want the wireless to connect to the Internet. After logging
into the Live desktop, the NetworkManager icon in the top right panel will tell
you if it already connected to the Internet and through which interface. If
you have wireless, you can use this interface to connect to a wireless network
at this time. Once you have done that, continue on to the next step.
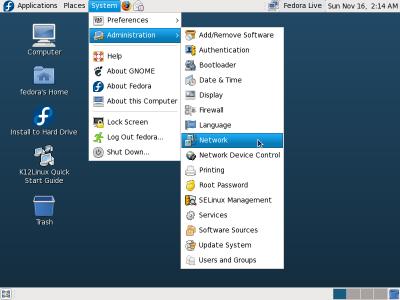
- We need to edit the configuration so NetworkManager no longer controls
the Ethernet interface serving the thin clients. Go to System -> Administration -> Network.
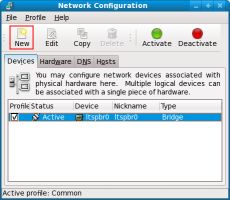
- In the Network Configuration window, click the "New" button.
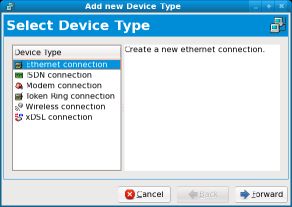
- In the Device Type column, choose 'Ethernet connection' and then click the
Forward button.
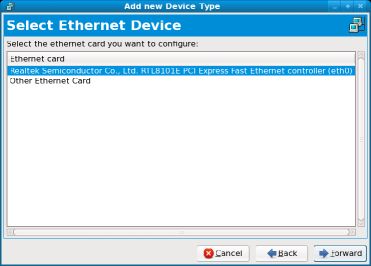
- Select the desired Ethernet card to serve your isolated LTSP network
segment. Be absolutely sure that this interface is NOT the one currently in use
to connect to the Internet. You can click on the NetworkManager icon to
verify which interface is currently in use. Click the Forward button when
you have highlighted the desired interface.
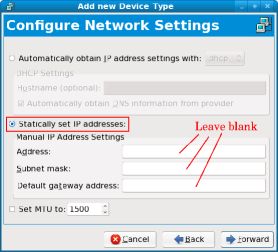
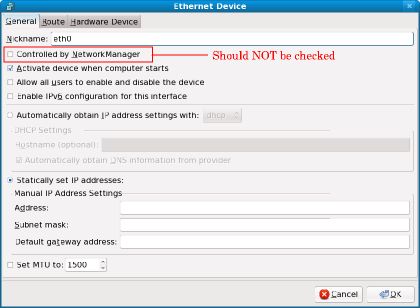
- Select "Statically set IP addresses:". DO NOT FILL OUT ANYTHING IN
THESE FIELDS. Click the Forward button.
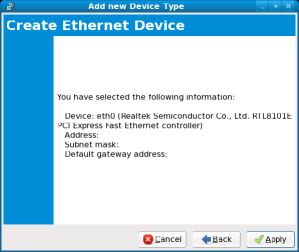
- A confirmation box will come up. Click the Apply button.
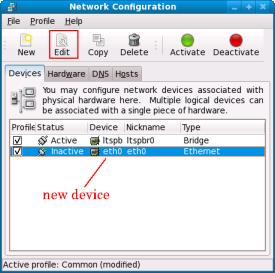
- You'll be back at the Network Configuration window, but now the Ethernet
device you just added should be listed. Select that new device and
click the Edit button.
- Verify that "Controlled by NetworkManager" is unchecked. Then click the OK
button.
- In the Network Configuration window, make a note of the name in the Device
column (the name in the Nickname column is probably the same) for the new
device you just created. You'll need to know this name for
the next step. In this guide, we will assume the device name is eth0.
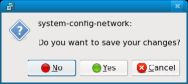
Close the Network Configuration window.
You should get a dialog box asking if you want to save the changes made;
click the Yes button.
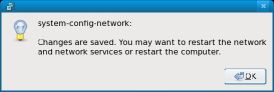
Next, you'll get a dialog box saying the changes have been saved, and
suggesting that you reboot. Click the OK button but do not reboot at this
time.
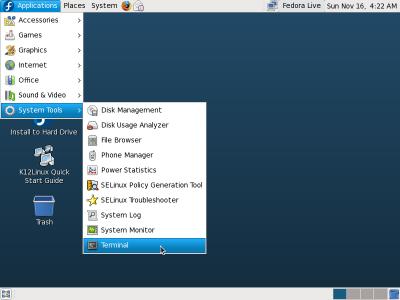
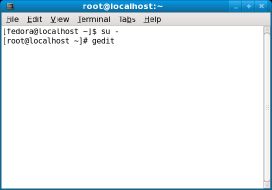
- Under the Applications menu, go to System Tools -> Terminal to bring up a
command line.
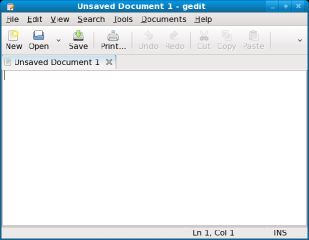
- In the terminal window, type 'su - ' to become root. Then type 'gedit' and
a graphical text editor will come up in a separate window.
 |
---> |
 |
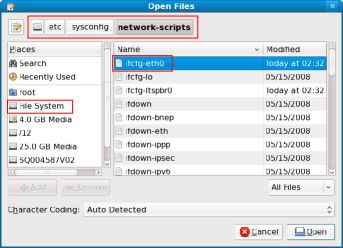
- In the gedit window, click the Open button, and then in the Open Files
window in the Places pane on the left, click File System; in the right pane,
click 'etc', then 'sysconfig', then 'network-scripts'.
(As you drill down, the path will be shown at the top of the window.)
In the right pane,
probably at or near the top, you should see a file called 'ifcfg-ethX' where
the ethX part is the same as the Device Name mentioned in step 10; in this
case, the file name is ifcfg-eth0. Select that file and click the Open button.
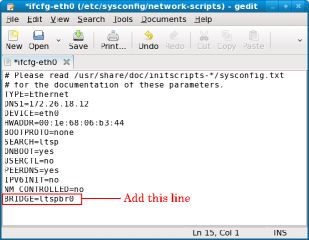
- Add BRIDGE=ltspbr0 to the bottom of the file. Save the file and
exit from gedit.
- Back in the terminal window, type ifdown eth0; you may get a message
saying "device eth0 is not a slave of ltspbr0"--you can ignore this. Next type
ifup eth0 where eth0 is the name of the Device you created in step 10.
(Yours may have a different name.)
Then type brctl show to verify that this interface is attached to
the ltspbr0 bridge.

- Now it's time to create a user ID that can be used for logging in on a thin client.
If you're running K12Linux from a hard disk, you have already created at least one user ID
during the installation; you can either
skip to the end of the guide, or use the steps below to create more user IDs.
(For more information on creating user IDs, see the
Fedora Installation Guide.)
By default, this K12Linux Quick Start Guide that you are reading
will automatically appear on the desktop of any users you create. If you don't want this to
happen, do one of the following in the terminal window:
- If you are running the LiveUSB version of K12Linux, type sudo rpm -e
ltsp-server-livesetupdocs
- If you are running K12Linux from the hard
disk, type su -c "rpm -e ltsp-server-livesetupdocs"
Close the terminal window when finished.
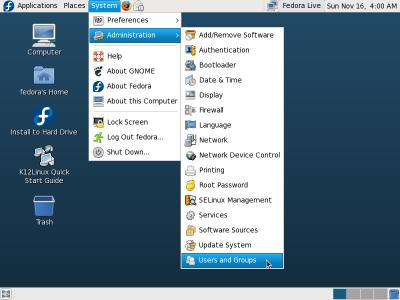
- Back on the Desktop, go to the System menu and choose Administration ->
Users and Groups.
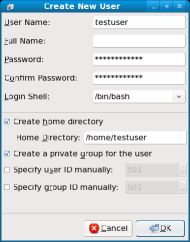
- In the User Manager window, click the Add User button and add a test
user.
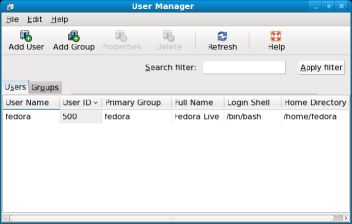
- Just use the default settings for this user. Once finished, close the
User Manager window.
At this point that Ethernet interface should be serving PXE network bootable
clients. If it does not work, please ask for help on the
K12Linux mailing list or in the
#ltsp chat channel on the Freenode IRC network.